1. Introduction
Welcome to the Centralized Ad Management Plugin! This WordPress plugin helps you manage ads across all your WordPress websites from one central dashboard. You can easily create, update, and monitor ads on multiple sites without logging into each one. This guide will walk you through installation, setup, and how to use the plugin’s features.
2. Installation
Minimum requirements:
- WordPress 5.0 or higher
- PHP 7.4 or higher
Steps:
- Download the plugin ZIP file from your purchase source.
- Log into your main WordPress site’s dashboard (this will be your central site).
- Navigate to Plugins > Add New and click Upload Plugin.
- Choose the ZIP file and click Install Now.
- After install, click Activate.
3. Plugin Overview: Dashboard Tabs
Your plugin dashboard consists of four main tabs:
- Ads: Manage all ads across your connected sites.
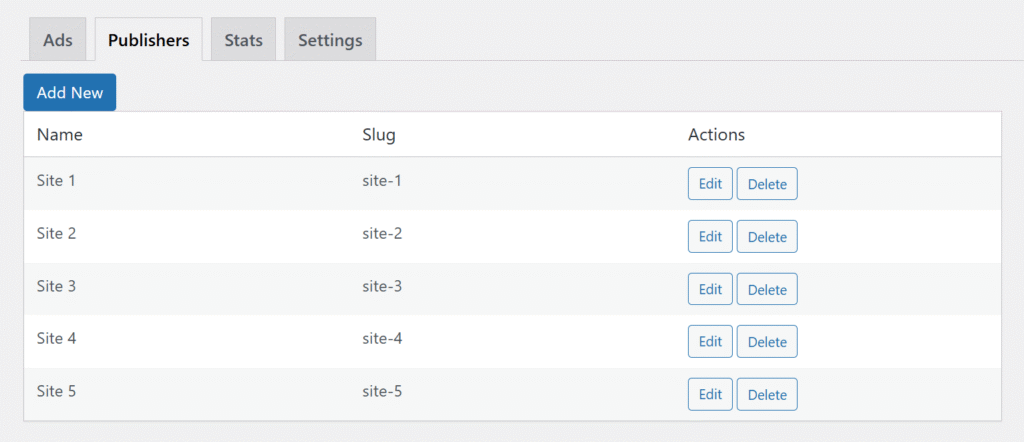
- Publishers: Add and manage your websites (publisher sites).
- Stats: View performance reports for your ads.
- Settings: Configure plugin options like ad refresh rates and allowed ad types.
4. Step-by-Step Usage Guide
Step 1: Add Publishers (Websites)
- Go to the Publishers tab.
- Click Add New to register a new website.
- Enter the Name and Slug of the site (a simple ID or URL-friendly name).
- Save.
- Repeat for all your WordPress sites you want to manage.

Step 2: Create Ads
- Switch to the Ads tab.
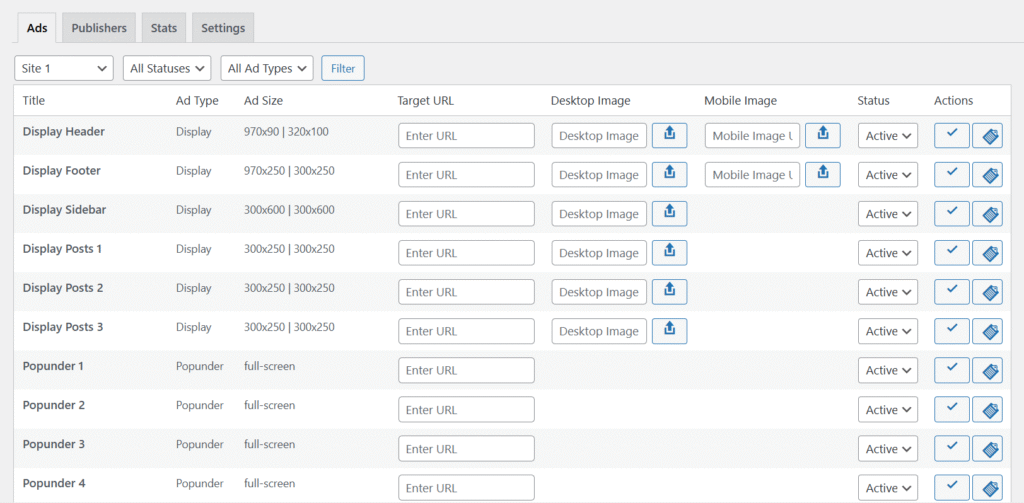
- You will see a list of your sites (publishers) across the top and filter options for ad status and type.
- Click Add New Ad or start editing existing ads.
- For each ad, fill in:
- Title (e.g., “Display Header”)
- Ad Type (Display, Popup, Popunder, Floating)
- Ad Size (e.g., 970×90, full-screen)
- Target URL — where the ad should link to
- Desktop and Mobile Images — upload images for different devices
- Choose status: Active or Inactive.
- Save the ad. You can filter ads by publisher site, status, or type to easily find them.

Step 3: Deploy Ads to Publisher Sites
- After creating ads, copy the provided JavaScript snippet from within each ad’s details or from the central management area.
- Paste this JS code once into the header or footer of the target WordPress publisher sites. This connects those sites to the central dashboard and displays the ads.
- The ad will now show on the publisher site and can be managed remotely.
Step 4: Monitor Performance in Stats Tab
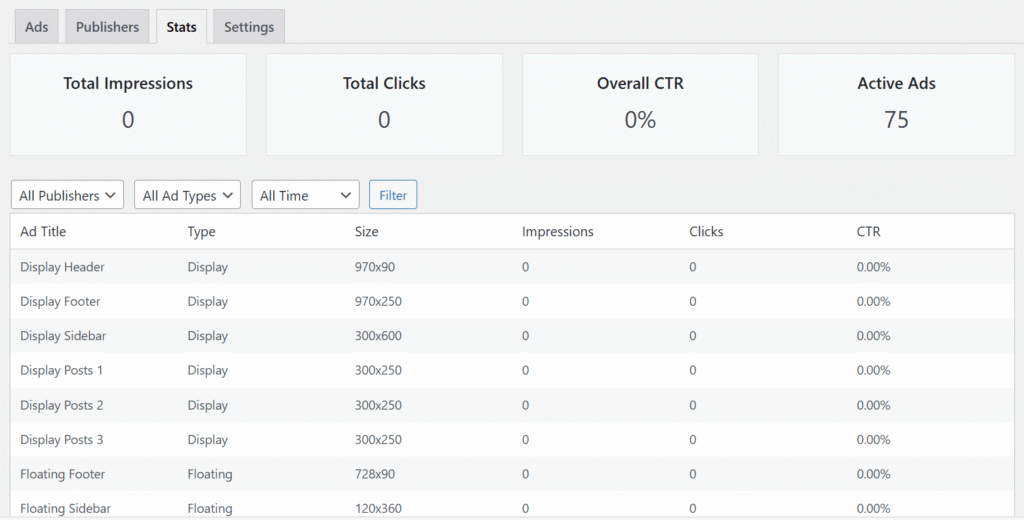
- Go to the Stats tab to see analytics including:
- Total Impressions (how many times ads were shown)
- Total Clicks
- Overall Click-Through Rate (CTR)
- Active ads count
- You can filter stats by Publisher site, Ad type (Display, Popup, etc.), and time frame (Today, Last 7 days, Last 30 days).
- Use this data to analyze ad performance and optimize campaigns.

Step 5: Configure Settings
- Visit the Settings tab to customize:
- Ad Refresh Interval (minimum 5 seconds) — how often ads refresh on publisher sites.
- Allowed Ad Types — choose which ad types to enable (Display, Pop-Up, Pop-Under, Floating/Sticky).
- Save settings to control how ads behave across your network.
5. Important Notes
- Order of operations:
- Add publisher sites.
- Create and assign ads in the Ads tab.
- Paste JS code on each publisher site once to connect.
- Monitor stats for performance insights.
- Adjust settings as needed.
- Ads only show after the JS snippet is correctly added to the target sites.
- You can manage all ads remotely once the setup is complete, no need to log into each site separately.
6. Tips & Best Practices
- Keep your ad images optimized for web (small file size) for fast loading.
- Regularly review Stats tab to pause or update low-performing ads.
- Use different ad sizes and types to increase user engagement.
- Schedule ad activation with status toggles (Active/Inactive) to control timing.
7. Troubleshooting
- Ads not appearing?
- Check that the JS snippet is correctly pasted on the publisher site header or footer.
- Clear any caching plugins on the publisher sites.
- Verify images and URLs are correct in the Ads tab.
- Stats not updating?
- Ensure connectivity between publisher sites and central management site (network permissions/firewalls).
- Refresh the dashboard and check again after some time.
- Contact support if issues persist.
8. Support & Updates
- You have free lifetime updates and support if you are an early customer.
- Check our website regularly for plugin updates and improvements.


