Clear step-by-step customization guide based on your TeleFeed dashboard details for setting up and embedding Telegram messages on your WordPress si
Step 1: Configure Telefeed Settings
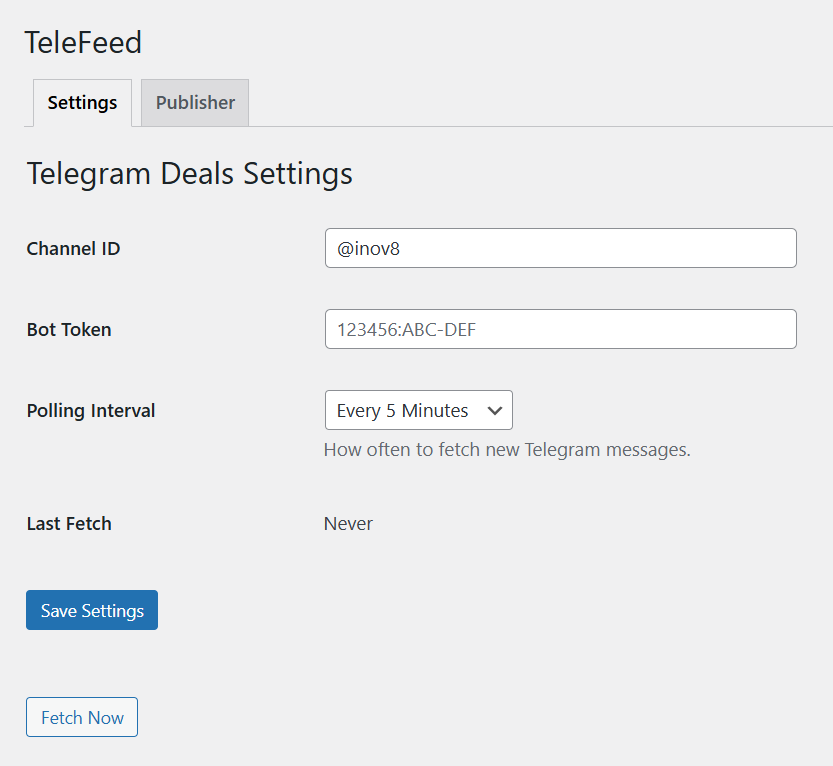
- Go to TeleFeed > Settings tab.
- Enter your Channel ID (the ID of the Telegram channel you want to pull messages from).
- Enter your Bot Token from your Telegram bot that has access to the channel.
- Choose the Polling Interval — how often new Telegram messages will be fetched:
- Every 1 Minute
- Every 5 Minutes
- Every 10 Minutes
- Save your settings.
- Check the Last Fetch field to confirm when messages were last retrieved.

Step 2: Add or Manage Telegram Publishers/Sites
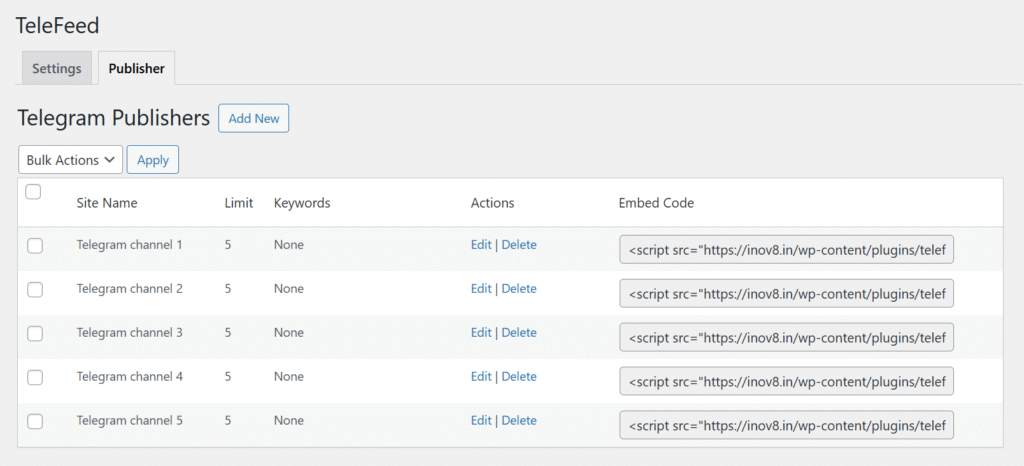
- Switch to the TeleFeed > Publisher tab.
- Click Add New to create a new publisher.
- Fill in the following fields for the publisher:
- Site Name: A friendly name to identify this publisher site.
- Limit: The number of messages to display from the Telegram feed.
- Keywords: (Optional) Keywords to filter messages. Only messages containing these keywords will be shown.
- Actions: Options to edit or delete the publisher.
- After saving, you will see an Embed Code generated for this publisher.

Step 3: Embed Telegram Messages on Your Site
- Copy the generated Embed Code for your publisher, e.g.:
xml<script src="https://inov8.in/wp-content/plugins/telefeed/code.js" data-key="site-1-NR"></script>
- Paste this code into any page, post, or widget area on your WordPress sites where you want Telegram messages to appear.
- The script will load and display the Telegram messages live based on your selected settings and filters.
Quick Summary:
- First, input your Channel ID, Bot Token, and Polling Interval under Settings.
- Then, add a Publisher with site name, message limits, and optional keyword filters.
- Copy the Embed Code from the publisher list and paste it on any of your WordPress pages or posts.
This setup ensures your site shows real-time Telegram messages customized to your preferences and embedded wherever you want.


